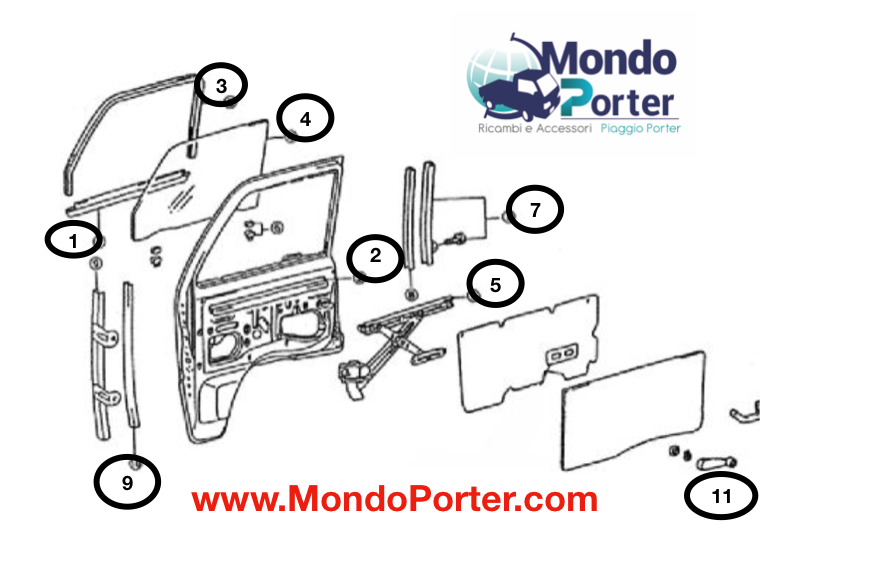
Piaggio Porter door components
 1. EXTERNAL Piaggio Porter Door Window Trimmer Gasket
2. Piaggio Porter INTERNAL Hatch Rasaver Gasket
3. Complete door glass trimmer gasket
4. Piaggio Porter front door glass
5. Piaggio Porter window regulator
7- Piaggio Porter window regulator bracket
9 - Piaggio Porter Front Window Regulator Bracket
11. Piaggio Porter window regulator handle
Piaggio Porter window regulator disassembly
1 - Remove the internal door handle by unscrewing the screw inside it

2 - remove the piaggio porter door lock tie rod
3 - remove the handle from the glass , the handle is fixed with a clip, just lever the clip with an Italian screw driver

4 - remove the internal door pull handle

5. Remove the Piaggio Porter door trim panel

6. Remove the external gasket from the front door glass .

7. Remove the internal gasket of the front door glass

8. Remove the piaggio porter internal windscreen gasket
9. Removing the piaggio porter front door glass

10-Remove the central bracket by acting on the bolts shown in the figure.

11- Remove the two fixing bolts of the front door glass unit .
12- Remove the Piaggio Porter door window
- Keeping the glass in a vertical position, pull it upwards.

13- Trace a reference on the front side of the glass to immediately identify the correct position for reassembling the limit switch.
Piaggio Porter window lifter installation
1. Piaggio Porter front window regulator installation
- Apply MP grease to each sliding section of the window lifter .
- Fit the front door window regulator using the three bolts.
- Insert the front door glass unit and temporarily tighten with two bolts.
2. Fit the complete piaggio porter windscreen gasket
3 . Tighten the two bolts.
- MAKE SURE THAT THE GLASS IS INSERTED CORRECTLY INTO THE FRONT DOOR.
4. Tighten the rear frame bolt then tighten the two front frame bolts.

5 . Fit the inspection cover.
6 . Install the door trim panel.

7 . Fit the components relating to the door trim panel.

- piaggio porter window handle

- Piaggio porter door internal handle


